Let me tell you the tale of a woman who started out with simple, humble plans for her children’s playhouse…and yet, they quickly skyrocketed into something much larger and more substantial. Yes yes, surprise surprise—that woman is me.
Kids Playhouse Ideas: Phase 1
When I first decided I wanted to build our daughters a playhouse (and when I say I we all know I mean Matt), it really started out quite simple.
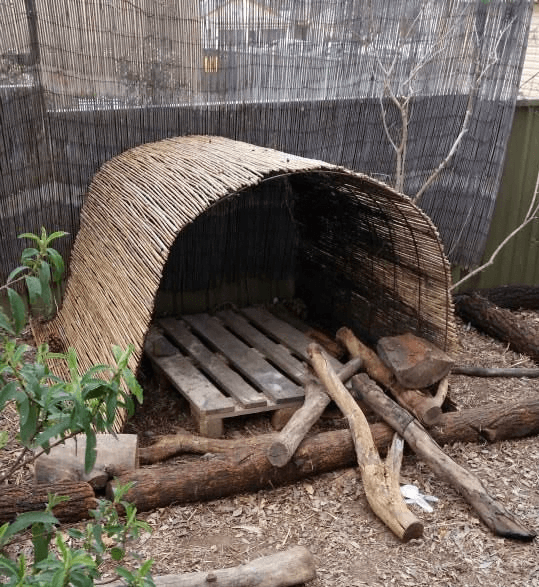
I showed the above pic to Matt and confirmed it would be super easy to throw together. (Literally. I think we could just throw that thatch over and call it good.)
I liked the idea of the girls not having anything fancy—of them just playing around in something raw and natural. (Sometimes I’m part hippie. Or maybe it’s Native American.) I also liked that we wouldn’t have to spend a lot of time on it; we could just put it together and let it be.
A SMALL ASIDE
Now I’ll admit, before completely moving on, I DID show him the photo I’m going to show you below because
- DOES IT NOT LOOK AWESOME? I WANT TO PLAY THERE!
- I secretly, almost childishly hoped beyond hope that he’d tell me it was possible, that his engineering mind could actually foresee a way to make this dream happen somehow, even though I told him I was showing him just for fun. (That’s the other [non-hippie] part of me: a ridiculously hopeful optimist. Sorry Matt—I wasn’t showing it to you just for fun. I seriously want nets and climbing logs to exist in our backyard so I can play too. Guys, I told you I loved Swiss Family Robinson. SFR4life, baby. Do you believe me now? Because this picture is part of Jess’s dream home. I’d like to climb down a log amidst nets to breakfast in the morning.)

unable to find a source for some of these photos so if you find one, let us know!
Needless to say, we had to stay with my little thatched hovel idea.
Then the whole pandemic thing happened, and we were going to be at home a lot more, and my desire for a larger playhouse for my children grew. You know, something that would last them a bit longer than some twigs stretched over a half-circle shape.
Thus, I graduated my ideas to something of the sort you are about to see.
KIDS PLAYHOUSE IDEAS: PHASE 2
This phase bumped the game up a bit.
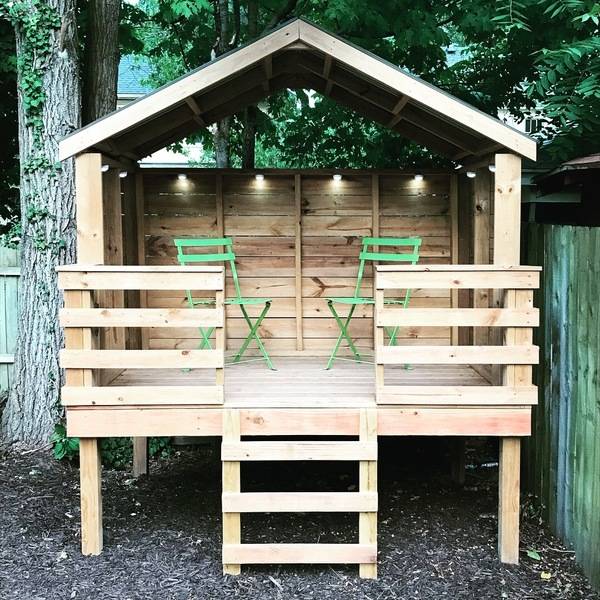
You know, still basic-ish but with a little more room. And a ladder they could climb. Still a playhouse and/or fort. My oldest really wanted a treehouse (and you know that’s right up my SFR alley), but unfortunately we couldn’t do that with our trees. (But I’m not counting it out entirely for someday…my hope springs eternal. Hmmm…maybe Matt is worried if he builds a treehouse that I will move out there permanently? Well-played, señor.)

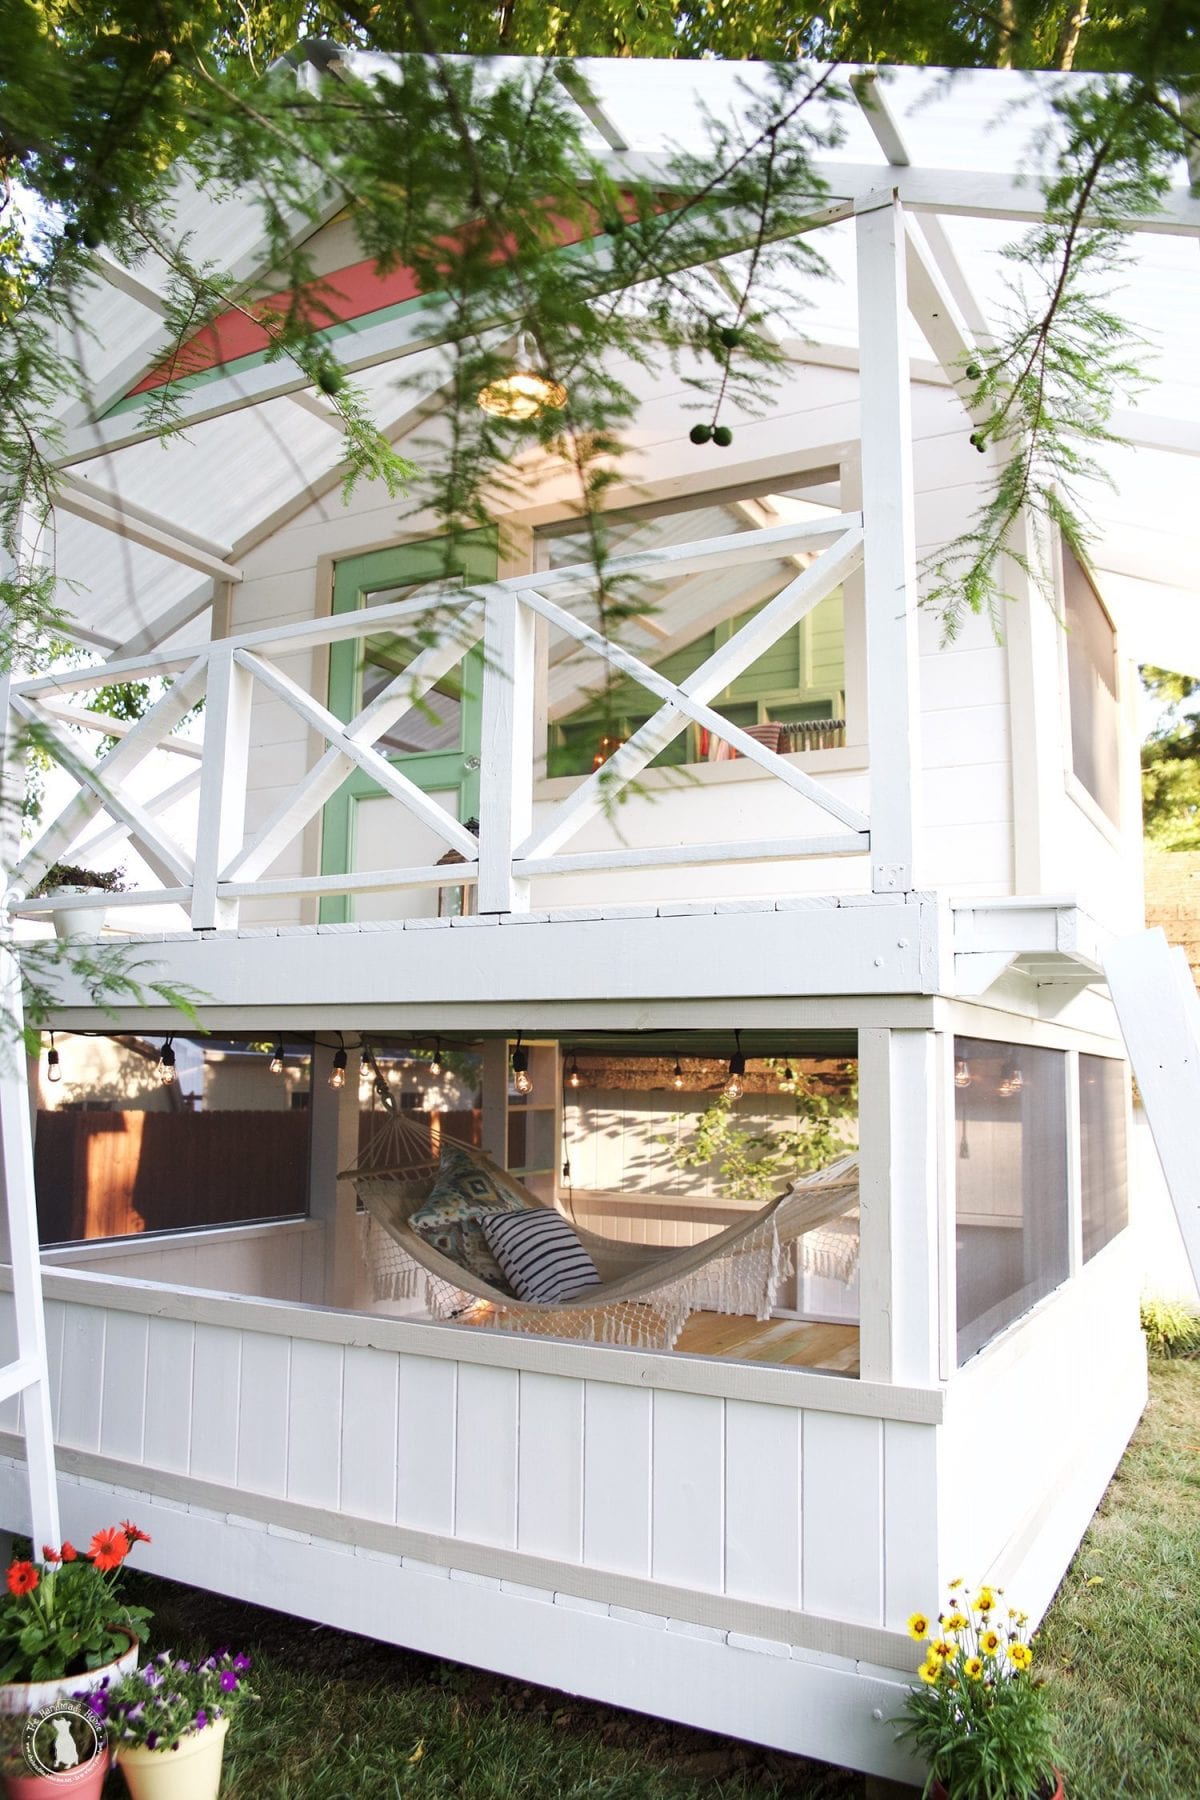
I DID hold out a momentary wish we could do something like the next pic (because it’s getting pretty close to a treehouse, is it not?!), but I think Matt responded with silence when I showed it to him, so I took that as a “Not going to happen.” And I chose not to push it because I need him on my side. Mama can’t build this playhouse alone; we all know that.
KIDS PLAYHOUSE SAGA: PHASE 3
I’m not really sure how things got kicked up to Phase 3. It all happened so fast!
Here’s the deal: I think ahead. And I mean AHEAD. And one day I was thinking ahead to having the girls getting older…and older…and realized that the playhouse/fort I was sketching out for Matt was going to be too small.
I didn’t want to waste time building something that would be as large as those Phase 2 playhouses but that they couldn’t use for at least the next 10 years. So I started fast-forwarding to 10 years and brainstorming what I could come up with that would suit them now and in 10 years. Something my six-year-old can use and enjoy now, and something my 16-year-old can use and enjoy then. Ya with me?
Impossible, you say? Nay. I believe it’s possible to get both, my friend. Come along with me (I’m putting one arm around your shoulder). Let me walk you through what I’m envisioning. Let me paint you my pretty picture:
- A place where younger kids can still have a treehouse-style, fort-type area to play in, and
- A place where adults and teenagers can still fit comfortably.
It could happen! I started imagining something like more of a “summerhouse.” I soon discovered in my research that some women are building “She-Sheds” with couches to read, or a spot to do yoga, or a place to paint with tons of natural light. Not a shed for tools. A shed for fun. A fun-shed. (Eh. I still prefer the word summerhouse. It’s so much cuter.)
A COUPLE INSPIRATION PICS
How cute is THIS summerhouse, people?!

And the below for a crafting studio totally reminds me of my oldest daughter who for years has told us she wants to be an artist. (As well as a NICU nurse, a ballet dancer, and a gardener, plus seventeen other vocations, but who’s counting?) Both girls are artistic, but then I think all children are! Just like Picasso said.

So, do I have you on board with this studio idea yet? Do you see how it can work for adults and teenage artists too? It needs to be modified, though. It can’t just be a straight-up shed. It has to have the treehouse-fort-loft element in it for younger kids to play in too.
Enter Jess’s loft-in-studio idea. You still with me? Good! This is fun stuff, yo!
KIDS PLAYHOUSE SAGA: PHASE 4
So, to give you an idea of what I’m picturing, I’ve found some pics that are kinda like my idea. (Because you know the internet never has pictures of what I actually want. But now that Matt and Jess have a blog, it will. My work for mankind will be done.)
This first example not only has the loft idea but also gives you an idea for what I’m thinking for below the loft: a built-in table area for younger kids to play in. (Think play kitchen, mud cafe, rock sorting area, etc…give kids a surface and they’ll fill it with something.) It’ll be a short area under the loft that adults wouldn’t be able to fit under comfortably, so for now that’s my idea for below the loft:

This next one has the more modern sloped roof I’m wanting (as opposed to the pitched roof above). Although the below looks MUCH taller than ours will be. We’re still keeping it relatively modest and within our city codes. And I want to put some kind of safety fence or wall along the edge of the loft for the littlest kids:

Speaking of a safety railing, how’s this for a mod-looking one?

We still have some of the black pool fencing left over, which looks pretty much exactly like the above metal railings, so I’m hoping we can find a way to reuse that! Matt? Yes? Calling in for official confirmation!
THE STUDIO SUMMARY
So to sum up, “The Studio” (as we’ve started calling it) will have
- OPEN MAIN AREA: An open main area where we can use for whatever (probably have a table and chairs in there for messy outdoor art projects or painting with the girls, or just doing some homeschool out there).
- LOFT: Then, to one side, a loft where the kids can play (and a kid-sized, wall-to-wall table below the loft, with kids chairs).
I realize a sketch might help if you’re not able to picture it, and so I’ll get something for you guys soon. Would I love to make it all cozy like the below someday? Sure! Love it! Looks more like a cabin! (Probably made even cuter because it’s actually in the woods and not in the SoCal suburbs.)

WHERE WE’RE PUTTING “THE STUDIO”:
I need to explain where we’re putting it so you understand why it’ll have to have a funky shape. We aren’t doing a basic square building, no siree. If you’ve taken the tour of our fixer upper’s exterior, you may remember this back area with a gate. They called it “the dog run.”
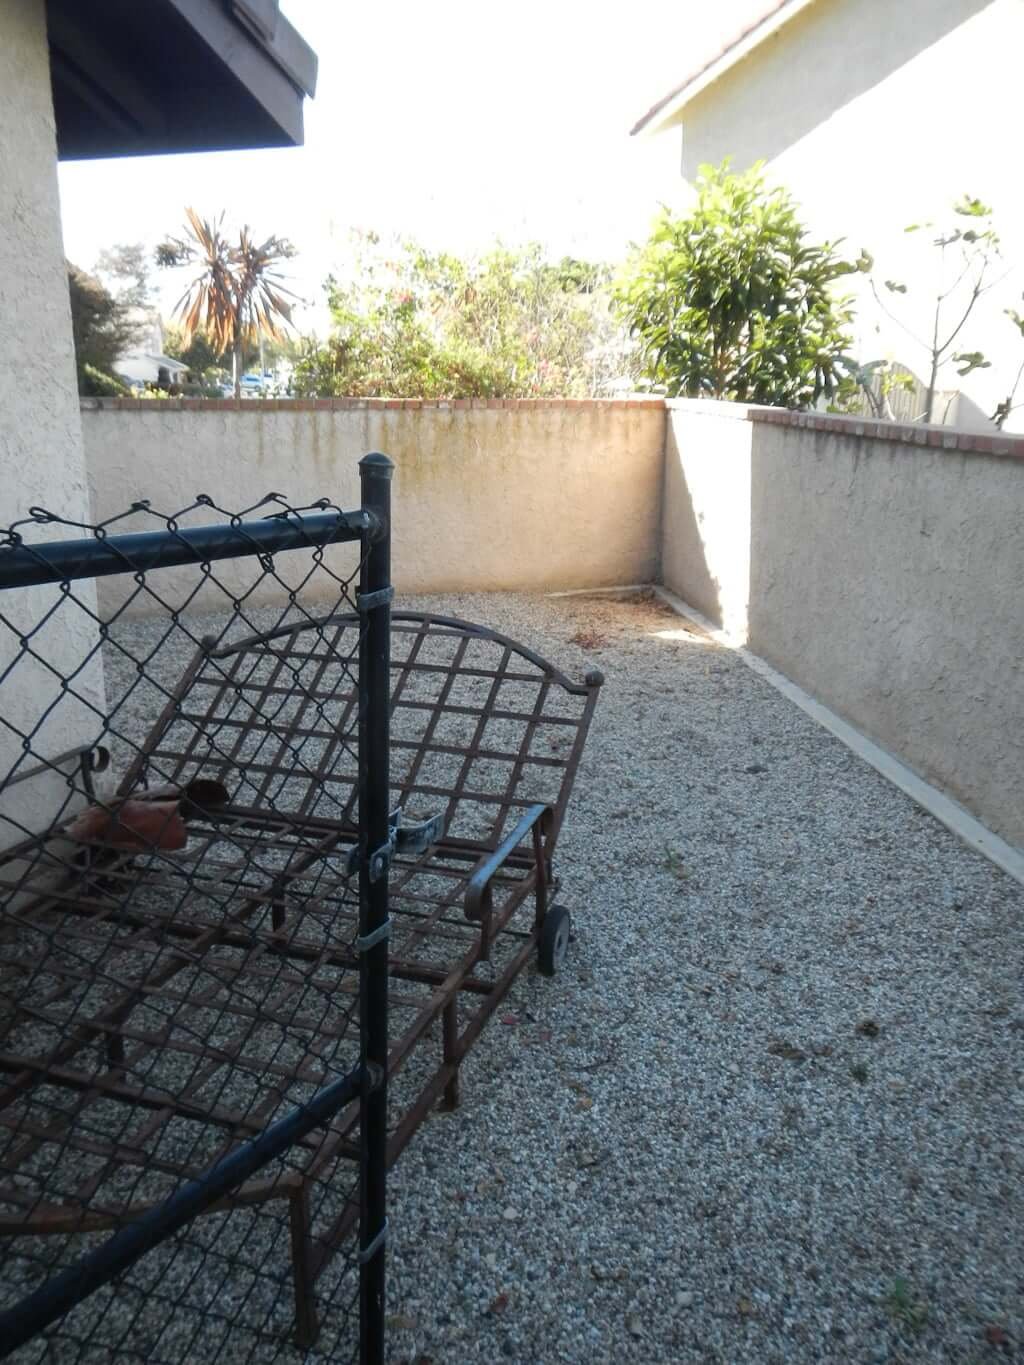
Back here is where we’ve decided the playhouse will go. It’ll check all the boxes to fit to all codes, and it’ll be a good spot for the girls since we’ve already been using this as our garden-slash-play area. It gets wonderful shade throughout the morning and a good part of the day (which is a huge blessing in summer).
PLAYHOUSE SHAPE
The funky thing about it is that this playhouse studio will be built into a corner. So not a perfect square—more like a diamond. We want to put two French doors in the front section so there’ll be lots of light, then tall windows into the two slightly angled walls on each side. Kinda like this:

But the roof will be slanted back from the front, similar to the below:
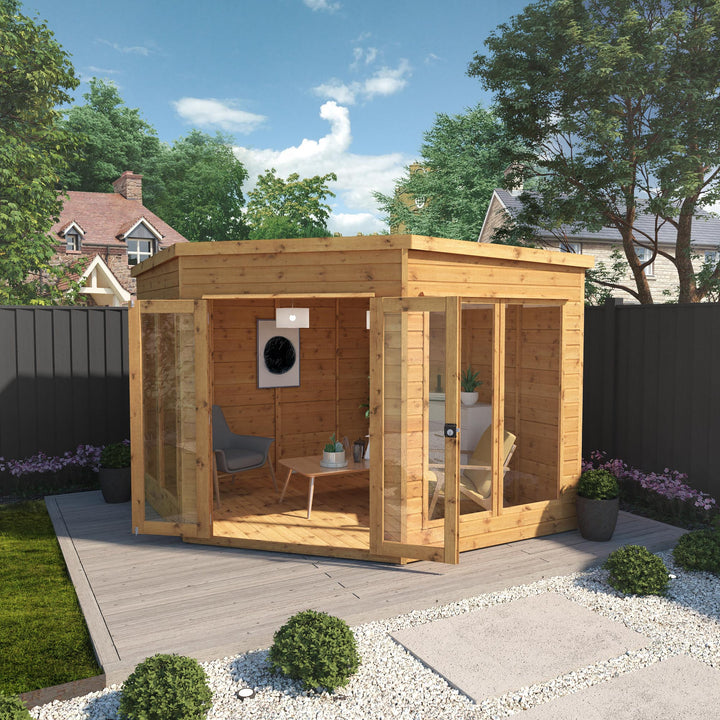
We only plan to do one window on each side (because that’s all we’ll have room for). In the meantime, we’re still debating:
- SKYLIGHTS: I always want to have more light, especially if this playhouse/studio is going to be used for painting and art projects, but because of the way the roof slopes back, I’m not sure I want the hot afternoon sun coming in from that angle. Still chewing on that one.
- DOORS: Debating between using old French doors with 10-lights vs. buying new 1-light more open/modern ones. (I’m about 90% sure we’re going with the modern ones at this point, but reusing old doors is also a temptation.)
Next, we start the building process (and show you what it’s REALLY like, in real life!).
You can also check out our updated homeschool room, or see all our house updates right here!
And if you’d like our help RIGHT NOW you can check out our plans & guides!


