Alternate title: “Where We’ve Been (and Aren’t Anymore)”
You know, we debated showing you guys pics of our first house.
For one, we didn’t document everything painstakingly. It’s all a pretty straightforward “Before & After” Party.
Two, it no longer reflects our design style, as it now clocks in at
OVER 20 YEARS AGO
when we young’uns bought it. 😉 (And we’ve sold or donated most of the furniture and decorative items shown in it!) So much has changed in what we gravitate towards now.
Third, to be honest, our Portland house brings up some painful memories for both of us. It was a time in our lives where we thought things were pretty good–but in retrospect see it differently. (Have you ever had one of those life phases? Maybe you were in unhealthy relationships and didn’t realize it until you got healthy? As Mariah Carey sings, “It’s like that, y’all!”)
And now I’m singing “…That y’all! Da da da da, a like that y’all!” Thanks Mariah.
But where would we be if we just wanted to toss out all the bad memories, we wonder? Sometimes they can still be useful to help us see more clearly, to appreciate where we are now and how much we’ve changed and how much better life has become through all that growth.
THE BACKYARD
This was probably our favorite transformation of all in our first house.
We loved that the house backed up to a greenspace with walking trails (and we wouldn’t have any neighbors living behind us, looking down into our backyard BBQs from their second story windows). But there wasn’t much there to begin with.
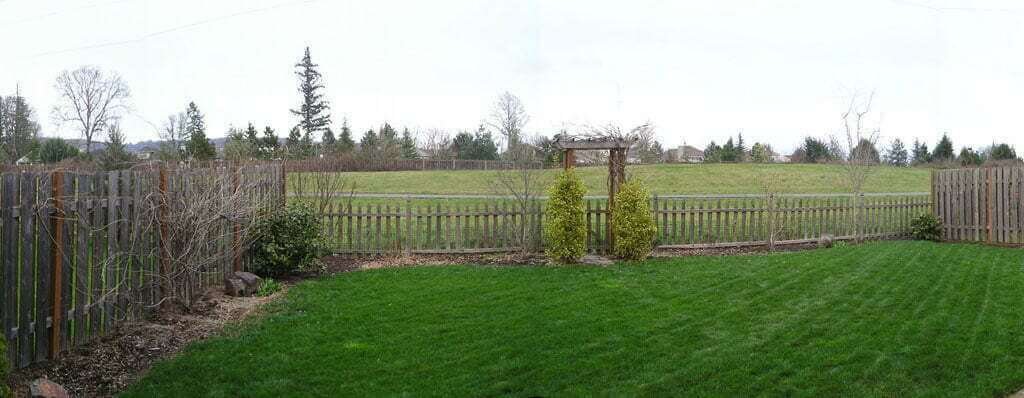
Over the five years we lived there,
we had so much fun
creating a backyard patio, arbors, doing tons of landscaping…all culminating in what became our backyard oasis!
(And what we heard was the most popular area during house showings when we later sold it.)
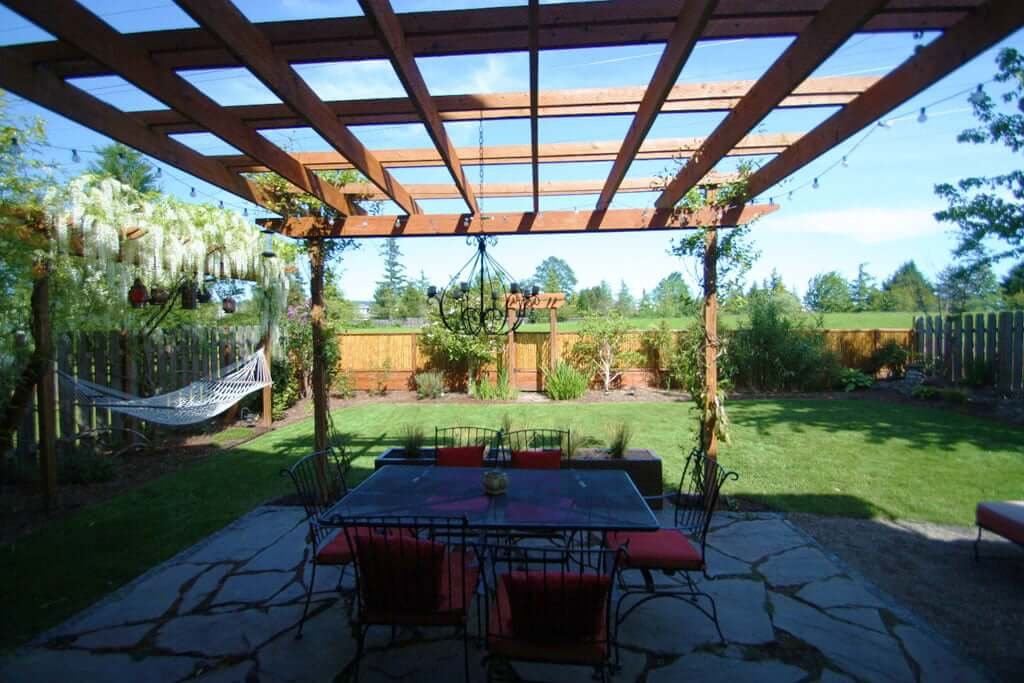
- Added a larger flagstone patio (with two TONS of flagstone—yep, that’s 4,000 lbs of flagstone that the two of us laid out)
- Built a large arbor over the patio
- Built a secondary arbor by the wisteria and set up a hammock there
- Added a sprinkler system
- Added two retaining walls
- Filled five different areas with four varieties of bamboo to create privacy, especially from the neighbors on each side
- Landscaped the backyard and gardened for an uncountable number of hours
- Added a new fence going out to the greenspace
- Poured a new concrete planter off the patio
- Added a garden on the side of the house
- Added a firepit area with a built-in bench
See more photos and details about the backyard.
THE HOUSE FRONT
When we first moved in, we just did a few small things quickly:
- hung some planters for flowers
- put jasmine in some copper-colored pots I found on either side of the doorway.
- replaced broken lights on either side of the garage
(If the garage door was closed, you’d see it’s the same color as the rest of the house.)
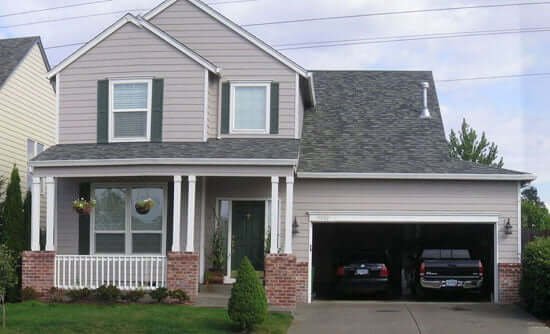
The original paint colors weren’t awful, but the house needed to be painted and so we decided to go for a dramatic color change.
This was our first time picking house colors and many of the houses built like ours in the late 1990s were that original beige color. All the newer homes going up at the time were painted darker colors, so we decided to go darker which stood our home apart from the rest of the neighborhood and—bonus!—made it look newer.
You can also see we minimized the front yard a bit. I had DREAMED of getting rid of the grass in front of our house (thinking 1) what was the point? it’s small and sloped and no one’s gonna play on it, 2) everyone in this area has a huge front lawn and doing some creative non-lawn landscaping in front could be really cool!).
Matt, however, put his foot down—at the time it just sounded too weird for him to take out the typical Pacific Northwest staple of a front lawn—and so we compromised by
- shaping the lawn into a smaller area, but still leaving some for “the look” of a lawn
- adding a rock river to the left
- planting a tree in the front left corner (I envisioned it becoming larger in a few years and giving a nice visual separation between us and the house next door, which felt a little close)
- adding various plants I wanted to be part of my life (New Zealand flax, anyone? yucca? banana plants? Yep, the ones nurseries told me wouldn’t grow well in that climate but at the time I liked to defy those planting rules…which sometimes worked and sometimes didn’t)
A LITTLE BACKSTORY (before getting into the rest of the Before & After Fiesta):
This is the first house we bought together, and we were looking for 2 things:
- A floorplan that had the kitchen open to the living room, and
- A private or could-be-made-more-private backyard.
That was pretty much it for us at the time (in our early 20s, no kids, and no idea what the future held for us). We hadn’t wanted something as big as this (it was just under 2,000 sq ft), but after searching for months and not finding the above two things until we saw this one, we had to make a decision. This house just happened to have four bedrooms (one of them very small), so we figured “Okay, we can raise kids here.”
Yeah, we didn’t raise kids there. We lived there for over five years, and then we rented it out when we decided to move to New Zealand.
THE FRONT LIVING ROOM
When you first walked in the door, this room was to your left—the first room you’d see.
Yikes. That’s a whole lotta teal.
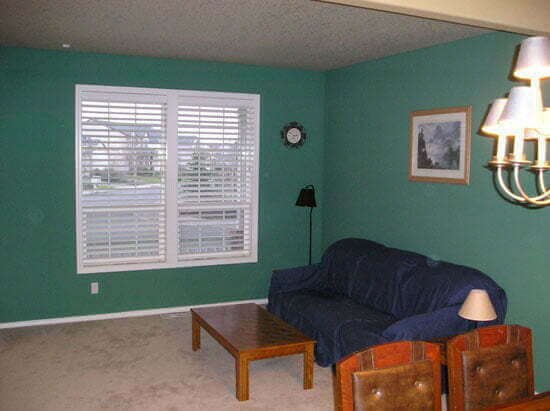
You can see the front door to the left.
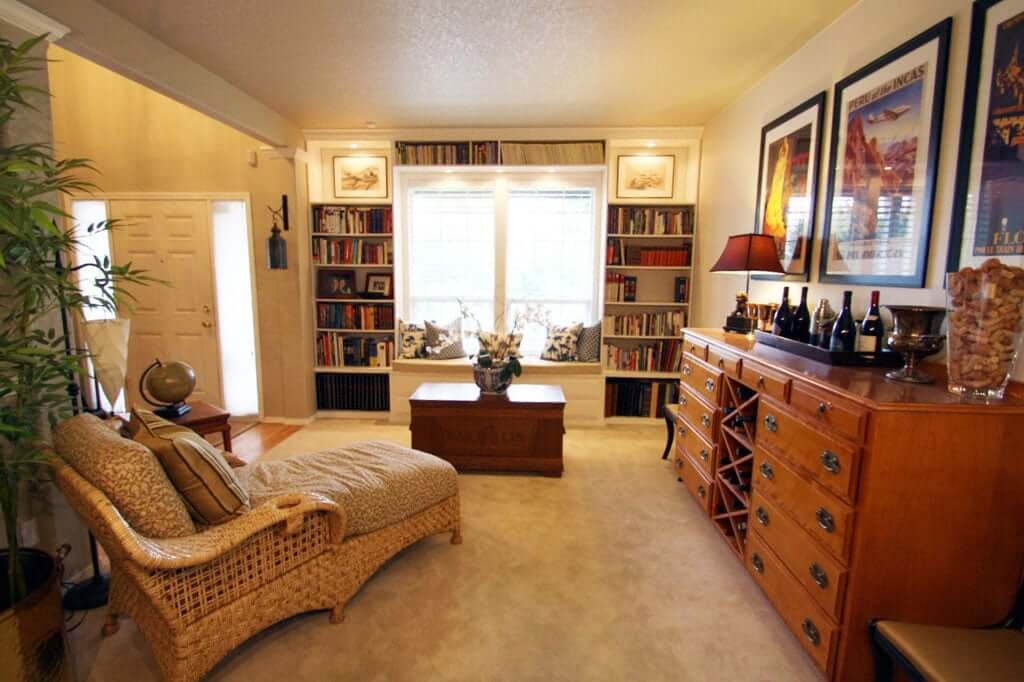
In this room, we
- painted over the teal color ASAP using Benjamin Moore Swiss Coffee
- added built-in bookshelves to go around the window (I designed, Matt built)
- added a window seat with an upholstered cushion
- sewed new pillow covers (I couldn’t find any in stores I liked, so I found my own fabric and made simple pillow covers for some inserts I already had on hand)
- designed full-extension drawers for storage under the window seat
- added two pieces of vintage art we had framed and highlighted with new overhead lighting
THE DINING ROOM
Again with the teal.
But just wait…the paint jobs get more intense upstairs…

And again we painted over it ASAP, with Benjamin Moore Swiss Coffee. It made the room feel less cave-like and—as this room was connected to that front living room pictured above—made the whole front area seem SO much more open.
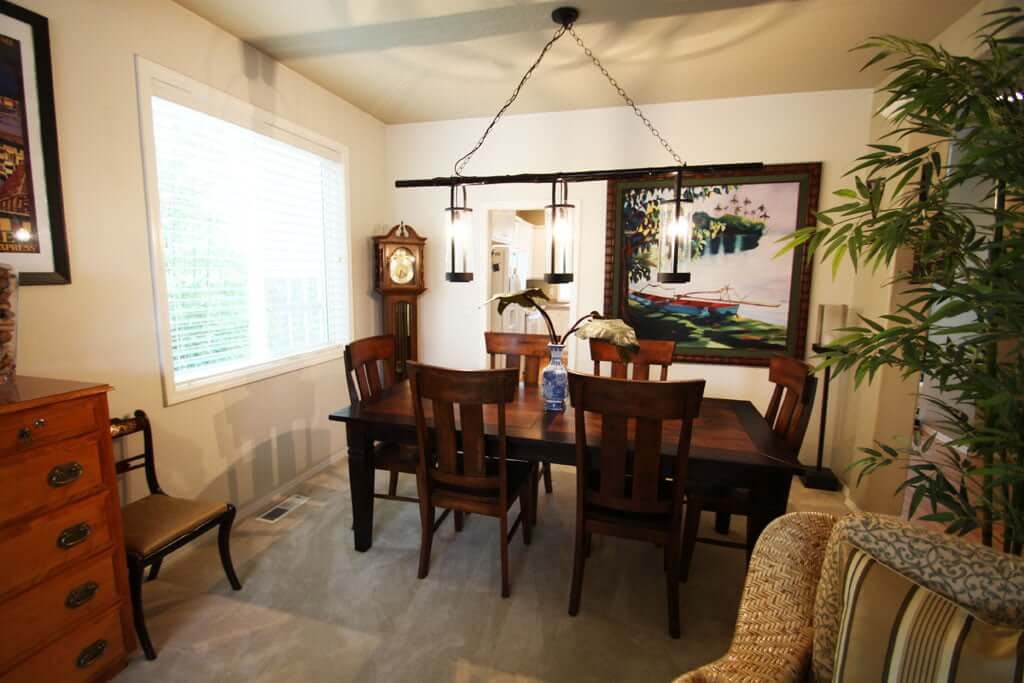
The only other “major” change we made here—besides our huge wall painting reminding me I’d like to go live on an island somewhere (which, as I think I mentioned earlier, we actually did end up doing)—was creating our own DIY chandelier.
I really disliked the old chandelier that was there. It was dated with the house and I wanted something different. But everything I found to purchase (that I liked) was $$$$.
One day, Matt and I were at IKEA and I saw some individual lanterns. Suddenly, I envisioned a DIY chandelier I could get onboard with. For only $45. We stood there in the store and I pitched my idea to Matt: what if we got some bamboo poles and suspended three of these lanterns from them—could he wire them to become a chandelier for over our dining room table?
Could he wire them…ha! Child’s play, he said. And so, our unique DIY chandelier was born.
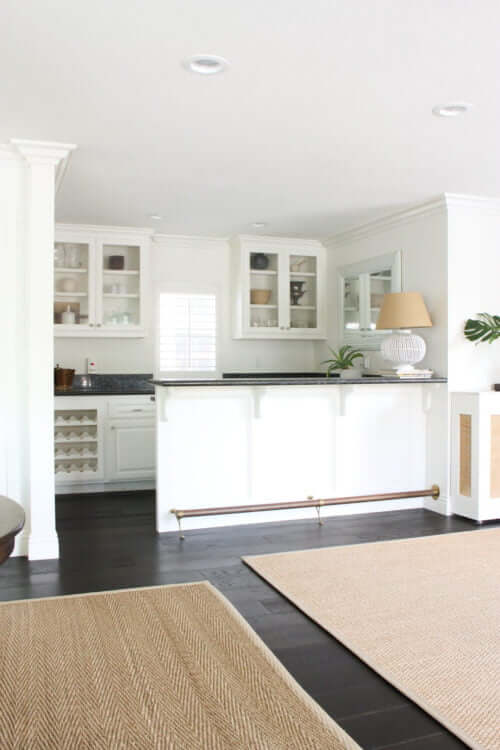
THE KITCHEN
Walk through that doorway seen in the dining room, or go to the right down the hallway and you’d view the kitchen.
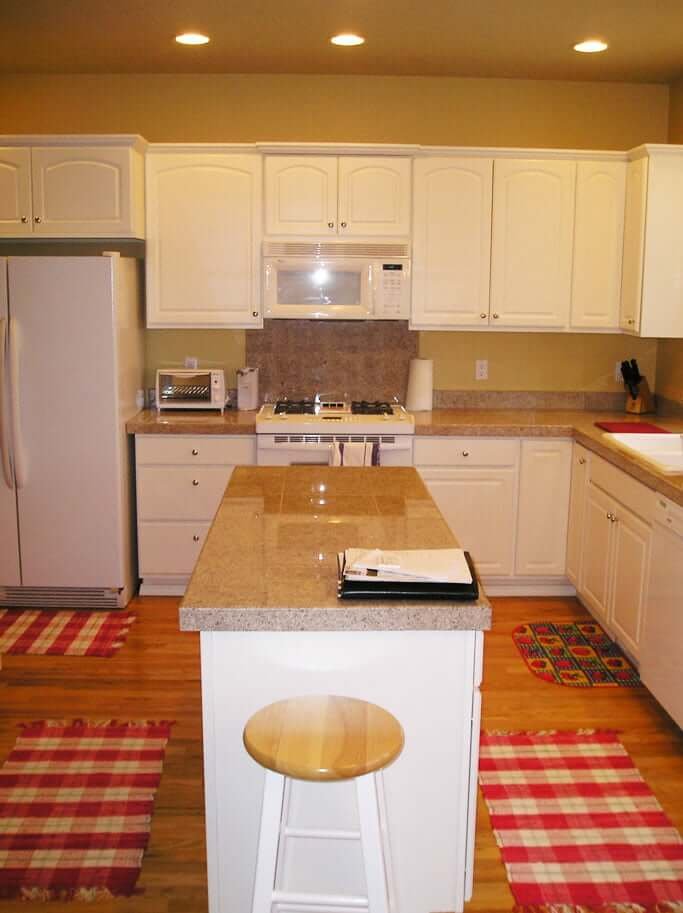
In here, we
- painted the walls
- replaced the kitchen faucet with an updated longneck design
- installed an instant hot water dispenser (EVERYONE NEEDS ONE OF THOSE!), and
- hung framed photography from our travels.

Had we moved back into this house after NZ, we would’ve done some MAJOR changes…but thankfully we didn’t move back to Oregon and you can see our incredibly “major” kitchen remodel coming soon in our current California house projects.
THE DINING NOOK
This area was between the kitchen and family room.
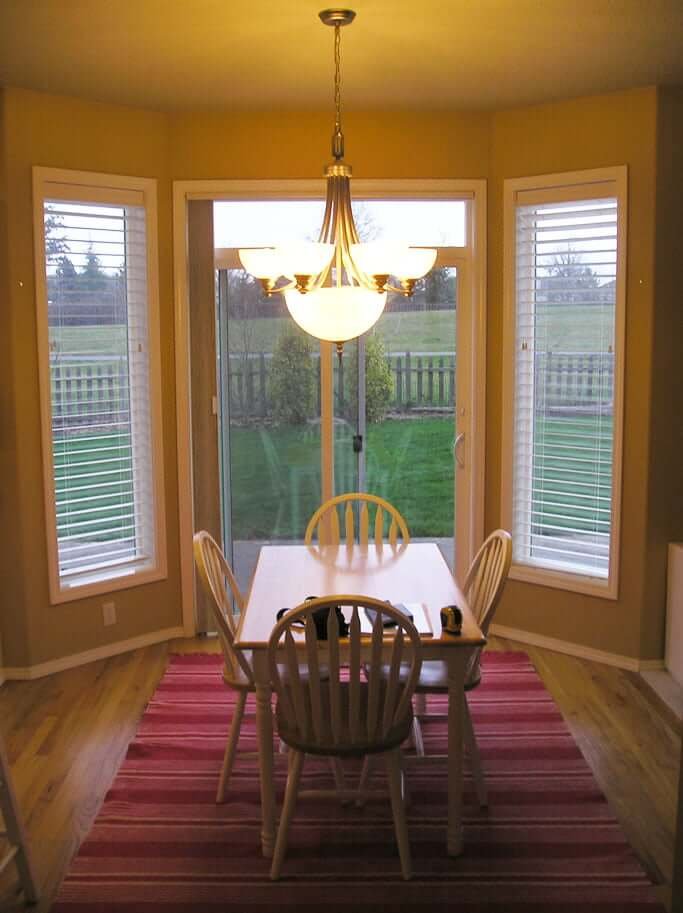
Again, I couldn’t do life seriously while looking at that 90s lighting fixture. We sold it on Craigslist and—again—figured out how to make our own DIY chandelier-pendant-lantern. (Take your pick.)
Here we
- installed French doors to the new patio we built outside
- added white linen curtains
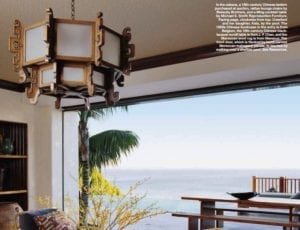
- designed, built, and mounted our DIY hanging light (this one based on a 19th-century Chinese lantern I had seen in a magazine earlier that year, pictured below)
To make ours a more modern version, we removed the extra decorative woodwork from the design:
THE FAMILY ROOM
This room was open to the kitchen and dining nook.
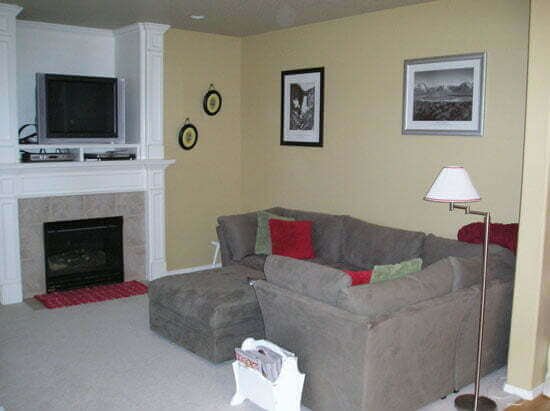
It was because of these three above rooms being huge and open to each other that we bought the house. We never got to do everything we wanted to in this room, but we did
- paint this whole room (same color flowing into the breakfast/dining nook and kitchen)
- design and build custom 8′ long wall shelves to host a gallery wall (that wall was so huge, I didn’t know what to do with it, so we came up with that idea—as you can see, the prior owner’s plan of hanging two random frames didn’t look too hot).
We would have loved to
- redo the fireplace and make a full floor-to-ceiling surround (losing the TV spot and hiding it somewhere else)
- create built-in bookshelves around the fireplace
- hang curtains, take out the carpet and make the entire downstairs hardwood flooring with rugs…there is no limit to Jess’s ideas!
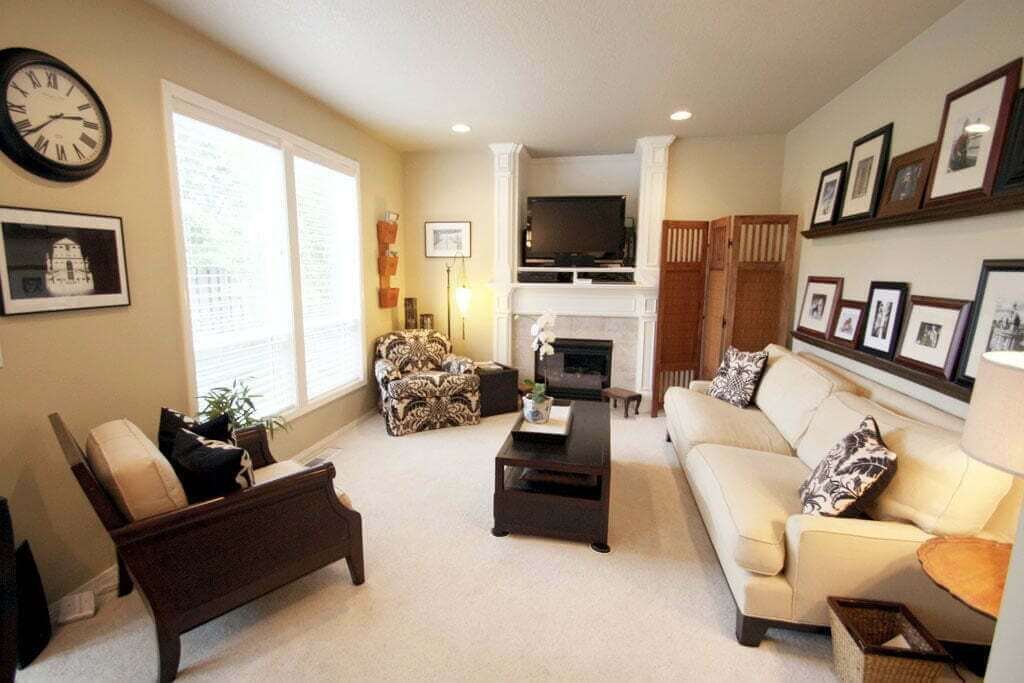
THE POWDER BATH

In here we
- added crown molding
- painted
- updated the sink faucet
- added a new mirror, hooks, and our framed travel photography
STAIRWAY
To get upstairs, let’s head back towards the front door and go up this stairway.
(Jess always wanted to create some fun storage drawers underneath this stairway. Matt said “What’s the point?” We’ll never get to know who was right.)
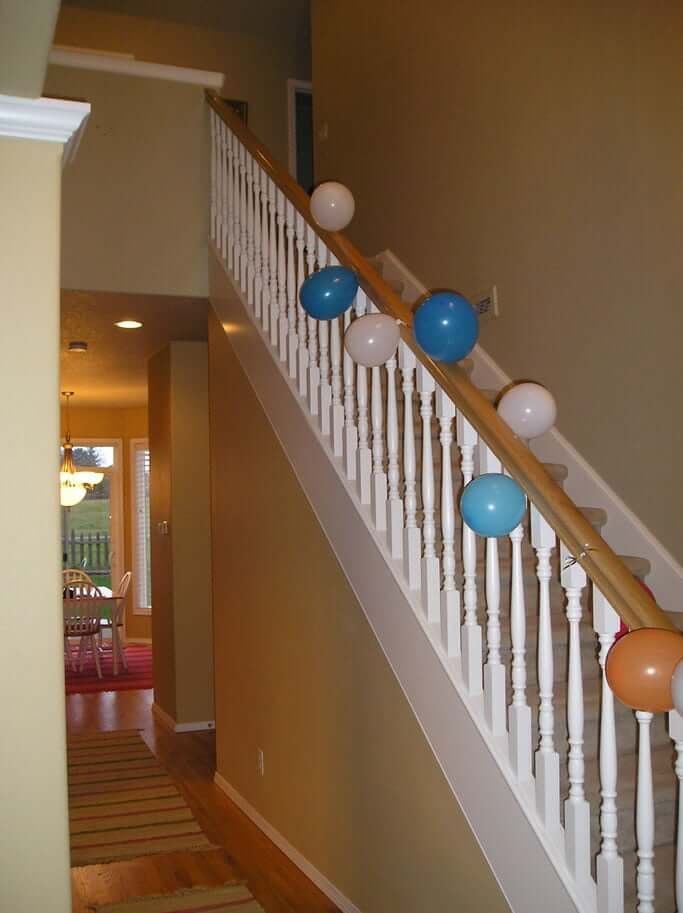
Going up the stairs, we hung a different photo of us in each country we’d traveled to at that point. Those were fun memories for us and always reminded us after a long day at work that there was another trip to look forward to!

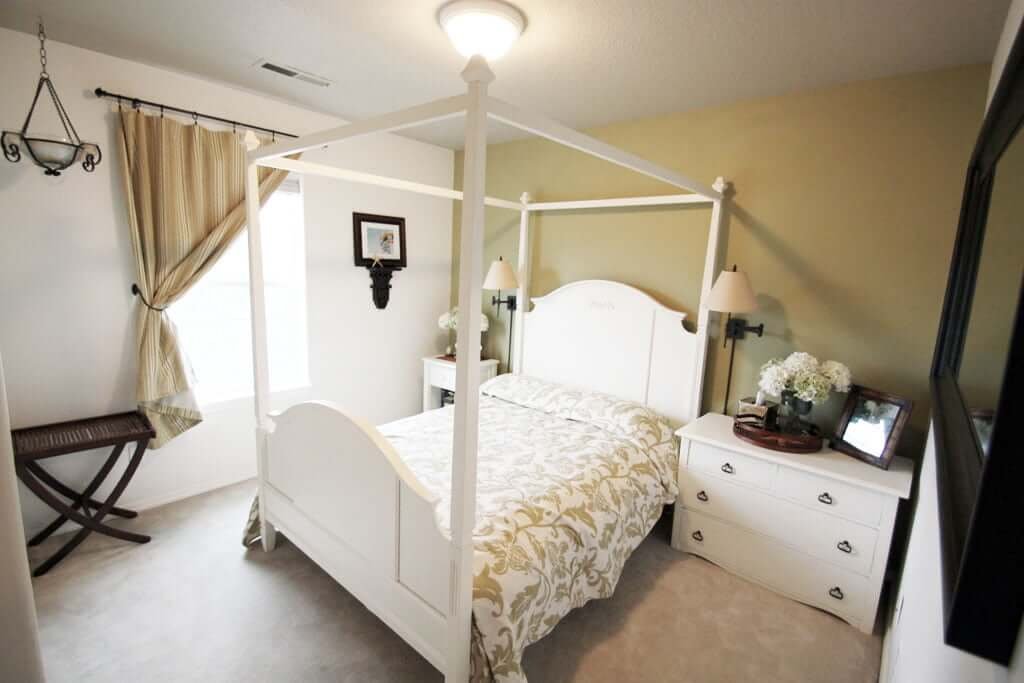
THE MASTER BEDROOM
At the top of the stairs was a small landing with double doors leading to the master bedroom.

Can you see the ceiling? The owners hadn’t just painted the walls blue—they’d painted the ceiling blue as well. Really made it feel so much smaller than it should have felt. (Tip: if you want a room to feel SMALLER, please paint your walls and ceiling a darker color.)
It took us FOUR COATS OF PRIMER & PAINT TO COVER OVER ALL THE BLUE! Floors AND ceilings. But we did it.
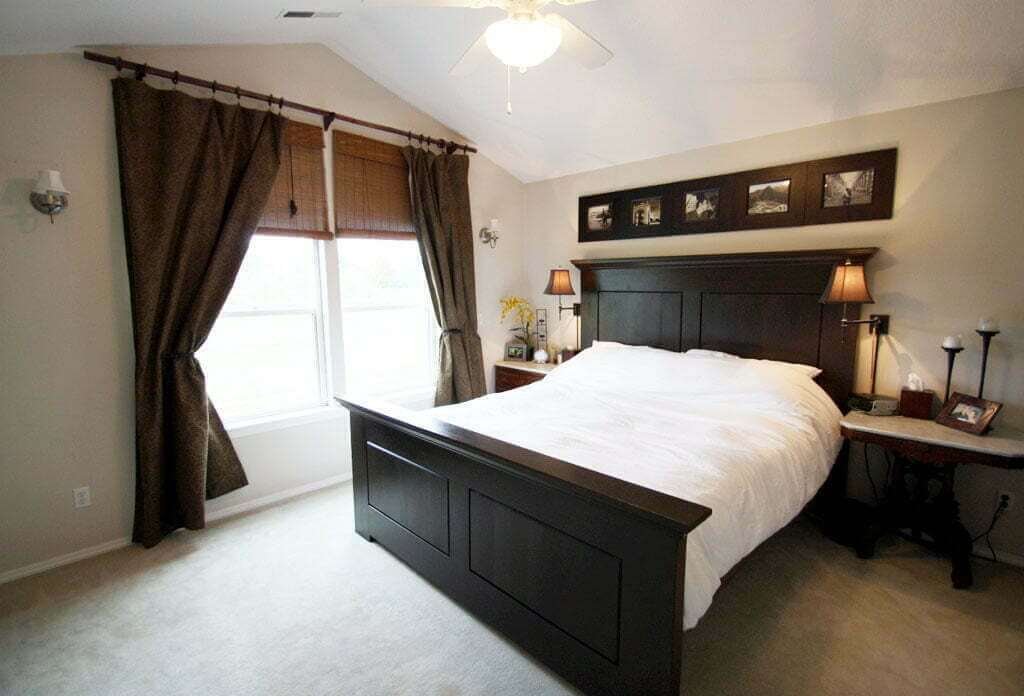
Matt built this bed! We needed a bed frame after getting married, and I couldn’t find anything what I liked anywhere (that’s a common problem). So I designed this one, combining elements I’d liked in a Restoration Hardware bed and a Pottery Barn bed. Discussed it with my furniture-making-husband and he made my sketch a reality. (Have I mentioned that building furniture is one of his hobbies? He even mentioned recently it might be his dream job.)
THE MASTER BATH
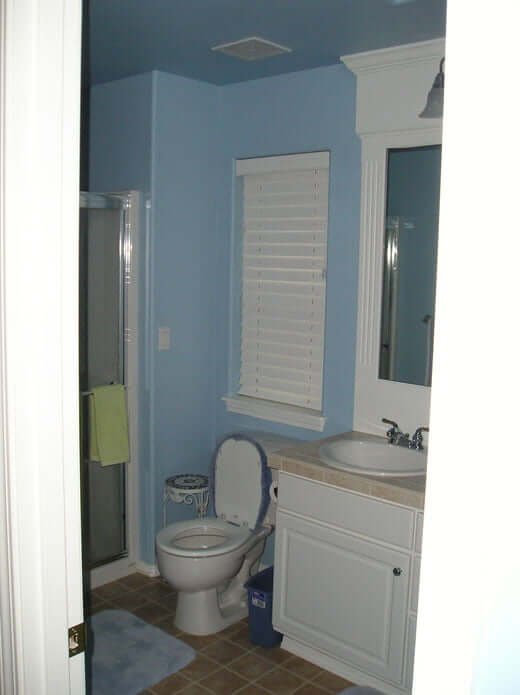
We made cosmetic changes in here, such as
- crown molding
- paint
- new fixtures and hardware
In this house, if a room was livable (functionally and visually), we let it be and turned most of our attention to the backyard work. (Makes sense looking back, since we love to be outside and hung out in the backyard a lot and entertained outside 90% of the time.)
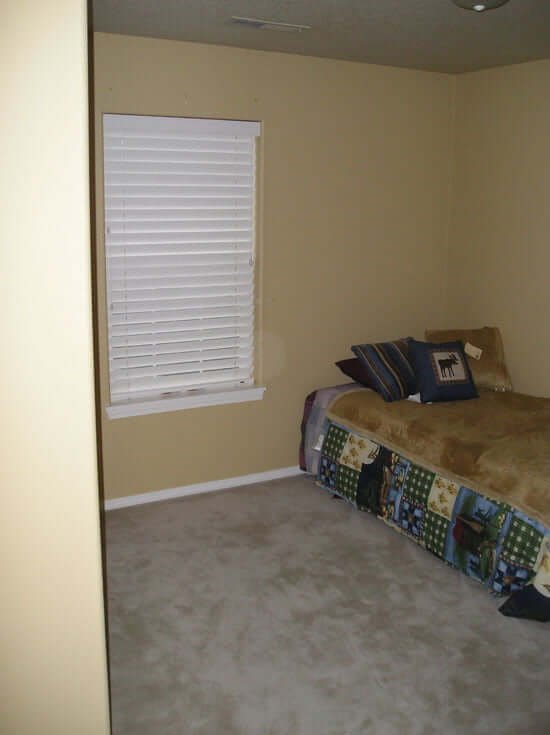
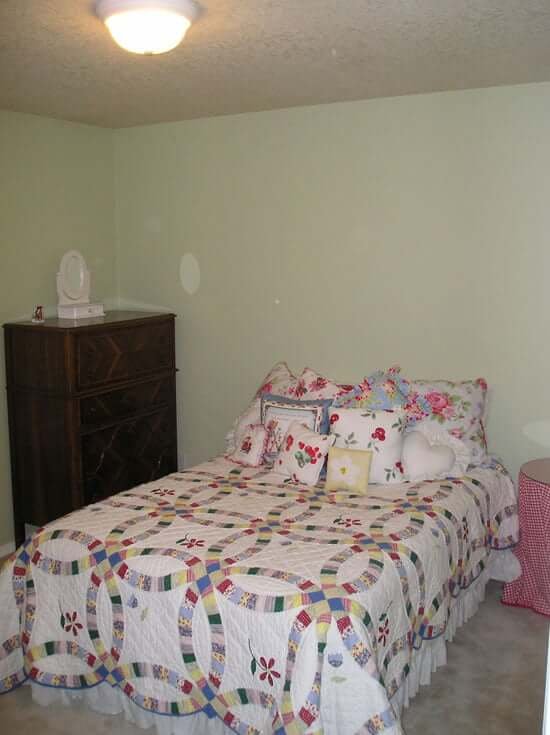
TWO BEDROOMS
Here I’ll briefly show you two of the other upstairs bedrooms. Pretty straightforward. The most we did in these rooms was paint and put in new furniture.
This room above we named “The Nanny Room,” for my grandma when she would come stay with us. (When I was a little girl, she’d wanted me to call her Granny but I could only say “Nanny”, and the name stuck.) I was SUPER close with my grandma, given her key role in my life. In this room, I asked Nanny if she’d like to choose her own furniture. She chose the bed and far corner nightstand. The bureau we got for $40 off Craigslist and painted white. The whole room was decorated for her.

This one served as an extra guest room with this antique French daybed that reminds me of Swiss Family Robinson and—here it is again!—makes me feel a little more like I’m on a tropical island.
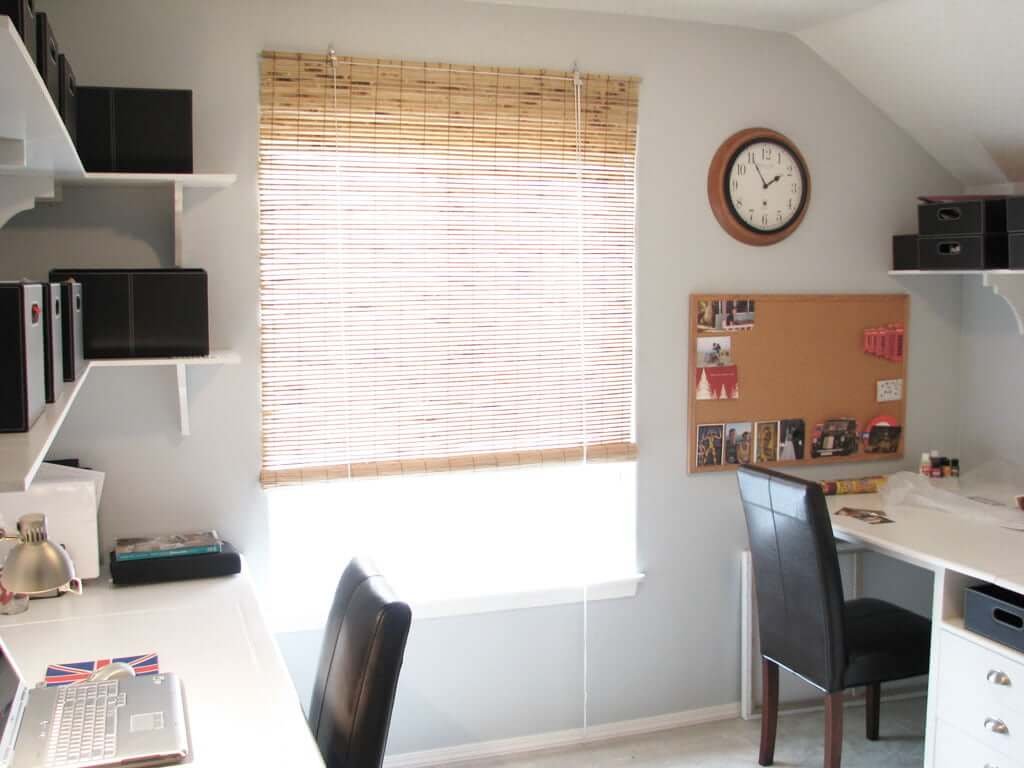
THE OFFICE
The fourth bedroom was smaller than all the others (plus the prior owners did their paint-the-walls-AND-the-ceiling trick again, this time in a dark blue that was even more claustrophobic feeling).
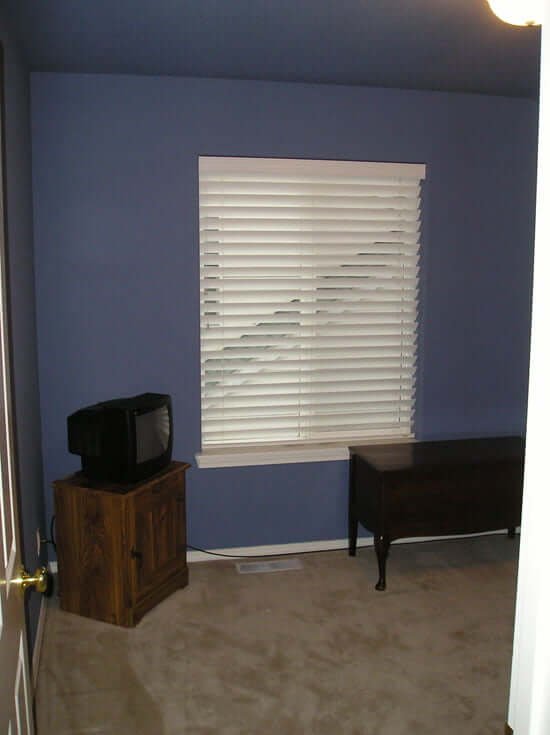
We lightened it up and made it into our office.
THE UPSTAIRS BATH
You might need a moment to take this in. (Personally, I can’t scroll fast enough past the magenta toilet seat cover and rug. Must get it out of my vision; it’s sending alarm signals to my brain.)
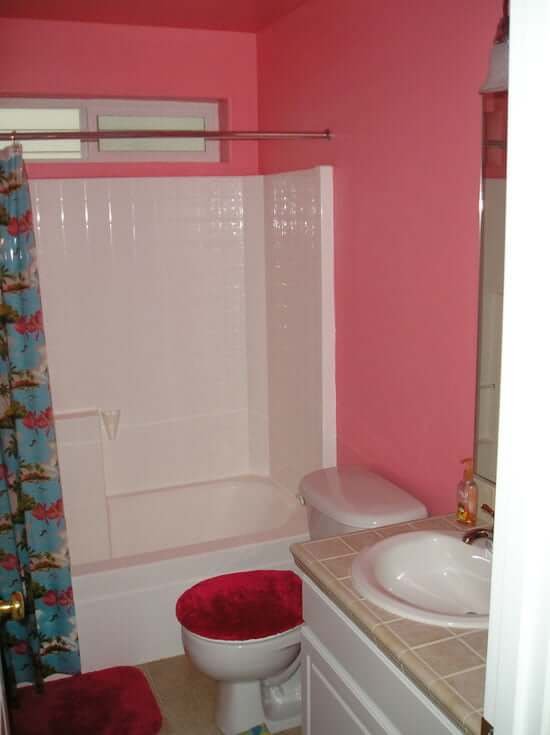
When my grandma walked into this room for the first time, she said cheerfully in her sweet older-lady-voice, “It looks like Mexico!” (She loved Mexico, had traveled there often in her younger years, and apparently this bathroom brought back memories.)
Sorry Nanny, but we painted over it. Updated hardware. That’s about all we got to in this bathroom before moving to New Zealand next….